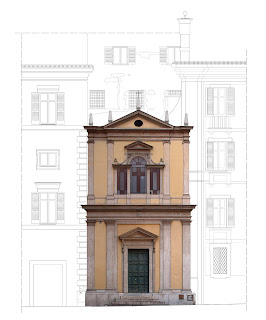
The image on the left is a
mosaic of several photos traced in
AutoCAD and representing the
architectural facade of
San Macuto in
Rome. In this case my CAD drawing is
superimposed on the mosaic.
All photographs I took contained perspective distortions which were eliminated with a freeware photogrammetry software called RDF. Then all images were composited in Photoshop and, as said before, traced in AutoCAD.
I could take the entire facade of the church in just one photograph but I needed all architectural details. It's almost impossible to do a work like this with a single image.
Precision mosaicing would require a dedicated software solution because Photoshop leaves us the task of mounting all photos together as best we can. Anyway the result is pretty cool and suggestive. Some programs offer an automatic vectorialization of a photo but I often don't like the results.
RDF uses a method called photogrammetry with measurements: the image is straightened up through measurements taken on the object of photogrammetry. So we need at least two measures (one horizontal and one vertical).
The programs offers two ways to fix the perspective distortion: analytic and geometric. I prefer the second way because it's faster and more intituitive, so I realised a short video tutorial to explain the geometric mode to straighten up photos with RDF.
 English
 and
Italian subtitles are available for this video. Locate the logo in the lower right corner and select the subtitles you prefer.
It's also possible to use this method to create perfect textures for 3D models.
The image on the left is a
render of a 3D model (
Concattedrale di Taranto by
Gio Ponti) I made some years ago.
All textures were created straightening up several photos with RDF. If the model has a good UV Map with the right aspect ratio, it's pretty simple to use photographs as textures.
In this case the result is often very realistic.


