lunedì 3 gennaio 2011

One year old

The 50th post is all dedicated to the first birthday of this blog. One year ago I started writing this little diary with no expectation, but in the hope to give back to internet a bit of what I was in receipt of. How many times do we earn money, create something or fix problems simply browsing the internet? We digit our keywords and someone somewhere helps us. The idea was to be the nth someone, one of many, to expand that marvelous microcosm of the internet community, the best form of cohabitation I have never seen, even though it's not free from problems. So I hope not to have written too much crap.
I don't want to miss the opportunity to thank the visitors ( I didn't expect so many ) and who took the trouble to mail me. Thanks a lot.
This post is planned for January, 3rd 2011 and it isn't too late to wish you a happy new year.

Best regards.

martedì 28 dicembre 2010

Problem with Google Images and Firefox - 2

By browsing the internet, my brother Massimo found out the solution for the problem described here. This problem is due to the router.
As explained here: 

"When image results are to be displayed, Safari and Firefox make multiple simultaneous connections to the host to retrieve them. This is usually faster than downloading one and moving on to the next and on and on."
...
"Some consumer-level SPI firewalls misinterpret the attempt to open that many simultaneous connections to one server as a "SYN flood" and block the traffic. Not good, especially when the connections are being made from your machine to an outside host, so the firewall is effectively blocking you from perpetrating what it thinks is a SYN flood."

The SYN flood attack is visible in the router logs. The solution:

"If your router allows configuration of its SPI firewall, you may be able to solve this problem if it has a setting labeled something like:

Maximum incomplete TCP/UDP sessions number from same host

On those routers, this setting is often set to a default of "10"; simply increasing this value to a much higher value - many have had good luck with "20" - will allow accesses to work as desired and will also allow some room for possible future expansion in the number of simultaneous queries made.

If your router does not offer such a setting, there's no solution other than to disable the firewall.

Note that any operating system - Linux, Solaris, even perhaps Windows 7 - could trigger the same problem. You can even generate the same issue in Windows XP by applying "speed tweaks" such as this."

domenica 19 dicembre 2010

Modeling a Cylon Raider - Central part

Yesterday I modeled the central part of my Cylon Raider. After the wings, this is the last part.

I decided to use a poly sphere to start sculpting the geometry. I chose to decrease the subdivisions axis to 12 and the subdivisions height to 8. At the end of the process it will be evident that these values are probably too low. I wanted to sculpt the piece as fast as I could, so I didn't need too much geometry. The sphere has been rotated by 90 degrees about X and Y. After that, I deleted the part filled with the yellow cross-hatching.


The "fuselage" is symmetrical, so it's possible to model half of it and then mirror on X axis. I decided to start the modeling process from the top  of the central part. The geometry has been scaled on the Y axis. The low poly geometry comes in very handy because it's possible to sculpt the shape easily. Obviously, it's possible to add some more geometry inserting edge loops.

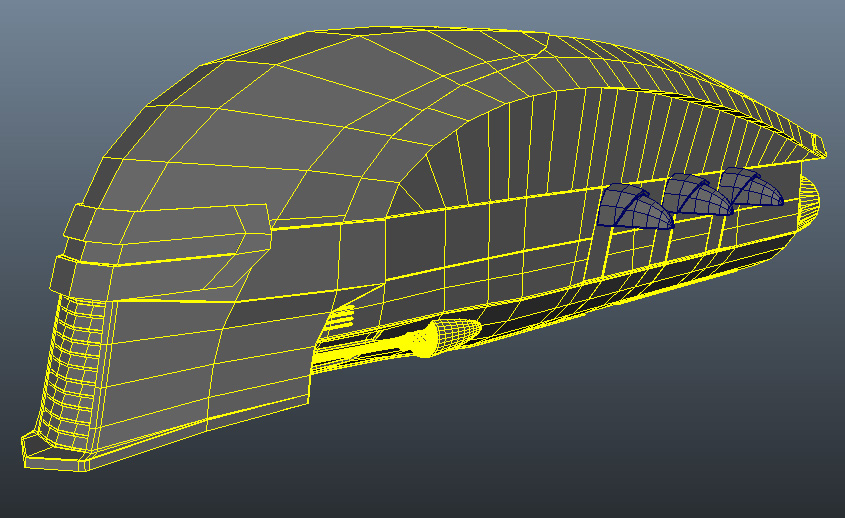
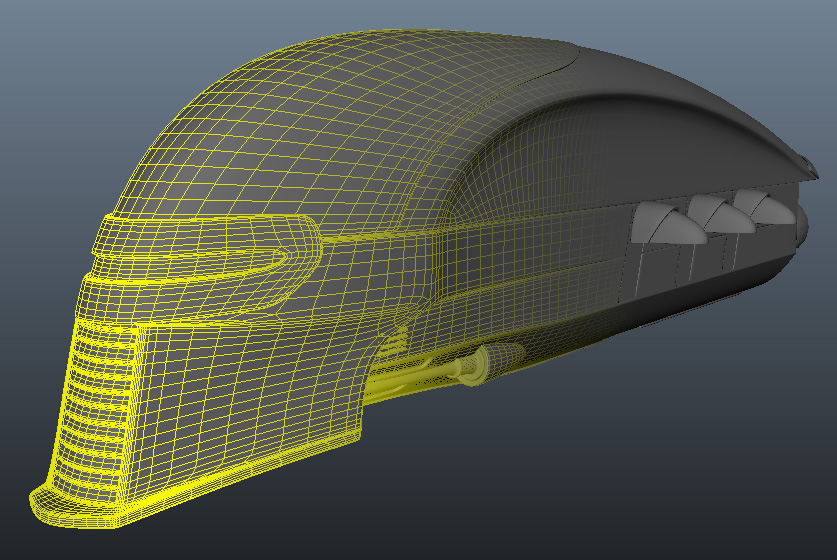
The shape was finished extruding the border edges. I decided to extract some parts to handle the model.  I added some edge loops to  reinforce the hard edges and not to have weird results when  I'll smooth the shape The image on the left is the low poly model. It has to be smoothed but it's quite similar to the original one.


This is the final geometry. As said before, I understimated the shape, because I wanted to model it quickly, so I needed to smooth two times the low poly model. The result is good but this is piece of geometry is quite heavy. It should be retopologized, but I have not much time now and texturing the model will be a time-consuming process, so, probably, I will let the model melt my cpus.


Best regards.

giovedì 2 dicembre 2010

Shelf buttons for loading and unloading Maya plugins

Shelf buttons for loading and unloading Maya plugins are very useful and, as a matter of fact, I use them every day.  I'd want to clarify that this method is not mine, but I don't remember where I read it, so I cannot give notice of copyright nor the right credits. I hope to correct this post as soon as possible.

Loading the plugin: we can copy (fixing the path to the plugin) the following lines to the Script Editor, select the text and drag it to the Shelf Bar:
{
    string $pluginFile = "c:\\path\\to\\plugin.mll";
    loadPlugin $pluginFile;
}
Unloading the plugin: same as above.
{
     string $pluginFile = "c:\\path\\to\\plugin.mll";
     if ( `pluginInfo -query -loaded $pluginFile` &&!
          `pluginInfo -query -unloadOk $pluginFile` )
         file -f -new;
     unloadPlugin plugin.mll;
}

Best regards.

mercoledì 1 dicembre 2010

Modeling a Cylon Raider - the wings

I have a couple of free days, so I want to start to model my last homage to Battlestar Galactica, one of my favorite TV Shows.
After the Viper MK II and the Cylon Centurion, it's the turn of the Cylon Raider.

I've found this blueprint as reference, so the first step is to crop all of the images in Photoshop. I will have four different images at the end of the process (top, left, bottom and rear) to import into Maya 2011 as image planes. It's important to use horizontal and vertical guides in Photoshop to resize correctly the images, because the references must have same dimensions.


First impressions: the original model is fantastic, I love the design and the final look, this fighter is really awesome. I don't know the authot but I'd like to pay him a compliment. It is interesting to notice that the model is composed of 4 parts: the wings (I can model one of them and then mirror it), the engines, the weapons and the central part. The fighter hasn't a linear design, but it's possible to break down it into 4 parts to ease the modeling process.


I decided to get started from the wings. I think the wings are the funniest and the most difficult part of this model. I'm using traditional methods to model the wing, nothing fancy: I get started from a box, extruded it a lot of times, added some edge rings and moved the vertices to match my reference images. I'd want to create a low poly model, because I'd like to animate a fight between the viper and the raider and obviously the raider will be destroyed.


Anyway, during the modeling process, I prefer to smooth the mesh to see if it's correct and perfectly rounded. This step helps me to notice that the bottom needs some correction.

In the meantime I decided to use the references as texture, so, in a next article, I'd like to share my method to project the images from a camera to create a new texture. First of all I will create the UV maps, then I will project the reference images from a given camera (unfortunately, it's not possible to use an orthographic one).


Best regards.

lunedì 29 novembre 2010

Replacing HTML entities with the appropriate characters in Javascript

I was looking for a good Javascript example to replace HTML entities with the appropriate characters and, after a long search, I found out this thread on stackoverflow. The function below, proposed by the user Tomalak, works like a charm for me:

var replaceHtmlEntites = (function() {
    var translate_re = /&(nbsp|amp|quot|lt|gt);/g;
    var translate = {
        "nbsp": " ", // Space
        "amp" : "&", // Char &
        "quot": "\"", // Char "
        "lt"  : "<", // Char <
        "gt"  : ">" // Char >
    };
    return function(s) {
        return (s.replace(translate_re, function(match, 
                                                 entity) { 
            return translate[entity];
        }) );
    }
})();
callable as
var strIn ="This string has special chars &amp; and &nbsp;";
var strOut = replaceHtmlEntites(strIn);


Best regards.

mercoledì 24 novembre 2010

The 12th Intl. Architecture Exhibition, People meet in architecture, in Venice

Two weeks ago I was in Venice to visit the 12th Architecture Exhibition, "People meet in architecture", organized by Kazuyo Sejima. I could talk a lot about this Biennale but I won't, because I basically agree with a message left on a toilet wall  ("the toilet wisdom" cit. my Brother Massimo Bolli)   from an unknown visitor (on the left). I will post here the videos of the best pavilions in my opinion. The "Biennale di Architettura" is over now and these videos will allow us to get the picture of this Exhibition, especially if someone didn't visit it.


martedì 2 novembre 2010

JSubs - Programma JAVA per scaricare sottotitoli da italiansubs.net

JSubs è un software JAVA Open Source pensato per scaricare automaticamente i sottotitoli delle serie TV dal sito italiansubs.net (e nell'ultima versione anche da subsfactory.it). Ho scritto JSubs perché mi capita spesso di accumulare un gran numero di puntate, anche di serie TV diverse, e scaricarne i relativi sottotitoli può essere cosa tediosa. Il software cerca in una cartella radice (e sottocartelle) gli episodi dei serial TV (i film o i video personali vengono scartati) e li elenca in una tabella. Cliccando sull'apposito pulsante, si possono scaricare i sottotitoli: JSubs si logga su Itasa, cerca i sottotitoli, li scarica, li unzippa e li rinomina.


CLICCA QUI PER SCOPRIRE IN MODO INTERATTIVO IL SOFTWARE SENZA SCARICARLO

(Si può cliccare sui pulsanti come se fosse il vero JSubs.
Si può inoltre cliccare con il tasto destro del mouse sulla lista dei serial per scoprire il menù.)

JSubs è un software gratuito, il link per il download è in fondo all'articolo.

In questo video si vede il programma in azione su Ubuntu, in particolare la feature, utilissima nel mio caso, del menù contestuale. Sia su Windows che su Ubuntu (nb: il file JSubsCMDL.jar deve essere eseguibile), JSubs può essere aggiunto al menù del tasto destro del mouse: in pratica si possono scaricare i sottotitoli con un semplice click sulla voce del menù, senza neanche avviare l'interfaccia grafica.


JSubs deve essere configurato per poter funzionare. I parametri necessari sono pochi ed alcuni di essi (la homepage di Itasa e l'indirizzo della pagina con l'elenco delle serie TV) sono già configurati. E' importante inserire il nome utente e la password per l'accesso ad italiansubs.net e  la  cartella contenente i video. E' possibile inizializzare un timer all'avvio del programma: JSubs, in modo ricorsivo, controllerà se ci sono nuovi video e scaricherà i relativi sottotitoli automaticamente, senza richiedere il nostro intervento.

I moderni Sistemi Operativi permettono di interagire con gli oggetti attraverso il menù contestuale o menù del tasto destro del mouse. JSubs offre la possibilità di aggiungere una voce al menù contestuale per scaricare i sottotitoli più velocemente, senza avviare l'interfaccia. Facendo click col tasto destro del mouse su un video, si aprirà il classico menù con in più la voce "Scarica sottotitoli con JSubs". Questa feature è supportata su Windows e Linux (attraverso le nautilus-actions, che devono essere installate).
Su Windows verranno create le necessarie chiavi nel Registro di Sistema, su Linux è possibile aggiungere automaticamente un'azione a nautilus-actions o creare un file di configurazione da aggiungere manualmente. Questa feature non è attualmente supportata sui MAC. La finestra delle Impostazioni permette di rimuovere le chiavi dal Registro di Sistema. Su Linux bisogna rimuovere manualmente l'azione con lo Strumento di Configurazione di nautilus-actions.

Sui sistemi supportati, JSubs si installa nella System Tray. Ciò significa che, se si clicca sulla X della barra, il programma non si chiuderà, verrà solamente nascosto, ma sarà ancora attivo nella System Tray. Per chiudere il programma utilizzare il pulsante con l'icona grigia nella finestra principale o File --> Esci nella toolbar. L'opzione più interessante del menù della System Tray è quella di modificare il timer di JSubs.


NOTE IMPORTANTI: JSubs è un software in versione beta, rilasciato sotto GPL e senza alcuna garanzia di funzionamento. Il programma era stato creato per uso personale, ma ho pensato che potesse essere utile anche ad altri. Utilizzo tutti i giorni JSubs su Ubuntu Lucid Lynx, Windows 7 64 bit e Windows XP Media Center senza problemi, ma va specificato che il software non è stato testato per una distribuzione pubblica.
Il programma utilizza librerie ed icone di terze parti e le relative Licenze sono incluse nel pacchetto.


Saluti.

sabato 30 ottobre 2010

Login to a website using Apache HttpClient and Jericho HTML Parser

The fastest way to create a program is to use code that’s already written: a library. Recently I got the need to build a HTTP-aware client application in Java. This application had to login to a website, download files automatically and logout. It was very important that the program was able to parse the HTML content to find the login form, execute the login in a correct way and then find the links to download files. I decided to use Apache HttpClient to access resources via HTTP and Jericho HTML Parser to parse the HTML content. In this article I will share the most important functions I'm using. These functions show the interrelation we can build between HttpClient and Jericho to achieve the original goal.

First of all, we need to import the libraries:
// Apache HttpClient
import org.apache.http.HttpEntity;
import org.apache.http.HttpResponse;
import org.apache.http.NameValuePair;
import org.apache.http.client.entity.UrlEncodedFormEntity;
import org.apache.http.client.methods.HttpGet;
import org.apache.http.client.methods.HttpPost;
import org.apache.http.client.ResponseHandler;
import org.apache.http.cookie.Cookie;
import org.apache.http.impl.client.BasicResponseHandler;
import org.apache.http.impl.client.DefaultHttpClient;
import org.apache.http.message.BasicNameValuePair;
import org.apache.http.protocol.HTTP;

// Jericho HTML Parser
import net.htmlparser.jericho.*;
Now we can write down a first, useful function to retrieve login data. Just a little preamble:

The traditional HTTP login form is something like this:

<form method="POST" action="action">
<input type="text" name="username" value="Username" /> 
<input type="password" name="password" value="Password" />
...
<\form>

It's important to notice that usually the form uses name/value pairs we have to deal with.

The buildNameValuePairs function parses the HTML document and returns a dynamic List<NameValuePair> encapsulating name/value pairs to login to a website. The first step in parsing a HTML document  is to construct a Source object from the source data, which can be a String, Reader, InputStream, URLConnection or URL. In this case, the function doesn't construct a new Source object by loading the content directly from the URL because it must remain inside the connection created by HttpClient. We don't need to create another connection and waste useful resources.
public static List<NameValuePair> buildNameValuePairs(
                                       InputStream is,
                                       String strUsername,
                                       String strPassword)
                                       throws Exception  {
        // Initialize the list
        List<NameValuePair> nvps = 
                      new ArrayList<NameValuePair>();

        // string arrays containing the column labels 
        // and values
        String[] columnLabels, columnValues = null;

        // Register the tag types related to the Mason
        // server platform.
        MasonTagTypes.register();

        // Construct a new Source object by loading the
        // content from the specified InputStream.
        Source source = new Source(is);

        // Set the Logger that handles log messages to null.
        // We are a windowed application and we don't
        // need to handle verbose outputs.
        source.setLogger(null);

        // Parses all of the tags in this source document
        // sequentially from beginning to end.
        source.fullSequentialParse();

        // Return a list of all forms in the 
        // source document.
        List<Element> formElements = 
                                     source.getAllElements(
                                      HTMLElementName.FORM);

        // Start the loop
        for (Element formElement : formElements) {
            String loginTag = 
                       formElement.getStartTag().toString();
            // stop the execution of the current iteration 
            // and go back to the beginning of the loop to 
            // begin a new iteration
            if (loginTag == null) continue;
            // Let's find the login form.
            else if (
              loginTag.toLowerCase().indexOf("login")>-1) {
                // Create a segment of the Source document 
                // containing the login form as CharSequence.
                CharSequence cs = formElement.getContent();
                // Constructs a new Source object from 
                // the specified segment.
                source = new Source(cs);

                // Return a collection of FormField objects.
                // Each form field consists of a group of 
                // form controls having the same name.
                FormFields formFields = 
                                     source.getFormFields();

                // Return a string array containing 
                // the column labels corresponding to the 
                // values from the getColumnValues(Map)
                // method.
                columnLabels = formFields.getColumnLabels();
                // Convert all the form submission values 
                // of the constituent form fields into a 
                // simple string array.
                columnValues = formFields.getColumnValues();

                break;
            }
        }

        /**
         * Now we can construct the List of name/value pairs
         * to login to a website.
         */
        for (int i = 0; i < columnValues.length; i++)
            nvps.add(new BasicNameValuePair(columnLabels[i],
                                          columnValues[i]));
        
        // if (columnLabels[i].equalsIgnoreCase("username")){
        // nvps.add(new BasicNameValuePair(columnLabels[i],
        //                                 strUsername)); 

        // return statement
        return nvps;    
}

Now we can build the master function that will establish a connection and login using the buildNameValuePairs function. We can pass 3 variables as arguments to the function: the URL to execute the login as String, username and password.

public static boolean loginExecuted(String strDomainUrl, 
                                    // user-supplied
                                    String strUsername, 
                                    // user-supplied
                                    String strPassword) 
                                    // user-supplied
                                    throws Exception {
        boolean bSuccess = false;

        // Create a new HTTP client and a
        // connection manager
        DefaultHttpClient httpclient = 
                                new DefaultHttpClient();

        // The GET method means retrieve whatever
        // information (in the form of an entity) is
        // identified by the Request-URI. If the Request-URI
        // refers to a data-producing process, it is the
        // produced data which shall be returned as the 
        // entity in the response and not the source text 
        // of the process, unless that text happens to be 
        // the output of the process.
        HttpGet httpget = new HttpGet(strDomainUrl);

        HttpResponse response = httpclient.execute(httpget);

        // An entity that can be sent or received with an
        // HTTP message.
        HttpEntity entity = response.getEntity();

        // The InputStream from the entity
        InputStream instream = entity.getContent();

        // Now we can call the function we built before
        List<NameValuePair> loginNvps = buildNameValuePairs(
                                             instream,
                                             strUsername,
                                             strPassword);

        instream.close();

        if (entity != null)
            entity.consumeContent();

        if (loginNvps.size() > 0) {
            // The post method is used to request that 
            // the origin server accept the entity enclosed  
            // in the request as a new subordinate of the 
            // resource identified by the Request-URI in 
            // the Request-Line. Essentially this means 
            // that the POST data will be stored by the
            // server and usually will be processed 
            // by a server side application.
            HttpPost httpost = new HttpPost(strDomainUrl);

            httpost.setHeader("User-Agent",
                       "Mozilla/5.0 (compatible; MSIE 7.0; 
                                          Windows 2000)");

            httpost.setEntity(
                     new UrlEncodedFormEntity(loginNvps, 
                                              HTTP.UTF_8));

            response = httpclient.execute(httpost);
            entity = response.getEntity();

            if (entity != null)
                entity.consumeContent();
            
            
            // At this point we can handle the connection 
            // as we like. For example we can check out 
            // if procedure was succesful (bSuccess = true), 
            // read the content, download files...
        }

        // return statement
        return bSuccess;
    }
That's all for now (I will check out this post as soon as possible to fix errors).
Best regards.