Visualizzazione post con etichetta Photoshop. Mostra tutti i post

martedì 6 settembre 2011

My 3D brother

I decided to create 3D portraits of people I love. I'm using Maya 2011 and ZBrush.

First of all the reference, a couple of photos to use as guide. I decided to to model the initial geometry in Maya because it's easier to navigate the viewport. This is quite important because it's all matter of proportions. Before importing the photos as image planes,  I altered the front view in Photoshop to match the perspectives.

On the right, the initial shape I modeled in Maya. I started from the side view drawing the profile and extruding the rest. During this stage I prefer to turn on a smooth mesh preview to see possible problems. I think I spent 3 hours, more or less, to model this shape.


Now it's time to run ZBrush. I'm using GoZ to quickly transfer my geometry back and forth between ZBrush and Maya. I imported my photos into Spotlight to sculpt, refine and texture the mesh. I didn't activate symmetry because the human body is not symmetrical. Initially I grabbed the eyes from demohead.ztl to have a reference, I made realistic eyes in a second moment.

Essentially in this phase I used the clay brush and the move topological brush to make further changes, for example the cheeks, the eyes, the ears and so on.
When this work was done, I decided to create the UVs. I used UV Master, a free plugin for ZBrush which lets us create very efficient UVs for our models in a few steps.
Now it's time to paint my model with the textures to have a more significant reference and refine the mesh with further details. I used a layer to store the texture. The powerful Spotlight allowed me to combine the front and the side view. On the left the front view applied to my model.


On the right all the photos have been painted on my model. I exported the texture to make further changes in Photoshop. For example, I decided to erase the hair and the eyelashes because I want to create them in Maya. The UVs I created with UV master allows me to reimport the fixed texture.


Now the details. With a simple noise effect I created a base for the skin and, using alphas, I'm adding details like big and small pores, eye wrinkles and so on.
After that, I will export the model to Maya to create a hair system and render the model with Mental Ray.


The next step consists of creating realistic eyes for my model in Maya. Now the eyes are quite important, they really can change a face but they are also quite complicated. Rather than importing an eye diagram into Maya and understanding how an eye work, I followed a fantastic free tutorial by Alex Alvarez (Gnomon). The biggest difference is that I used a marble texture for the veins, Alex used an effect from Maya. Anyway the veins are really small and I don't think I'll zoom on them.

First of all the hair system to complete the model. A lot of curves to easily style the hair, the eyebrows and the eyelips. Then I created a a bunch of maps (epidermal, subdermal...) to plug into a misss_fast_skin_maya material to achieve a realistic skin. I plugged a mia_exposure_photographic and a physical lense dof node lense into my camera.

So, on the right the final result. I'm quite happy because this is my first 3D portrait.

Best regards.

mercoledì 1 dicembre 2010

Modeling a Cylon Raider - the wings

I have a couple of free days, so I want to start to model my last homage to Battlestar Galactica, one of my favorite TV Shows.
After the Viper MK II and the Cylon Centurion, it's the turn of the Cylon Raider.

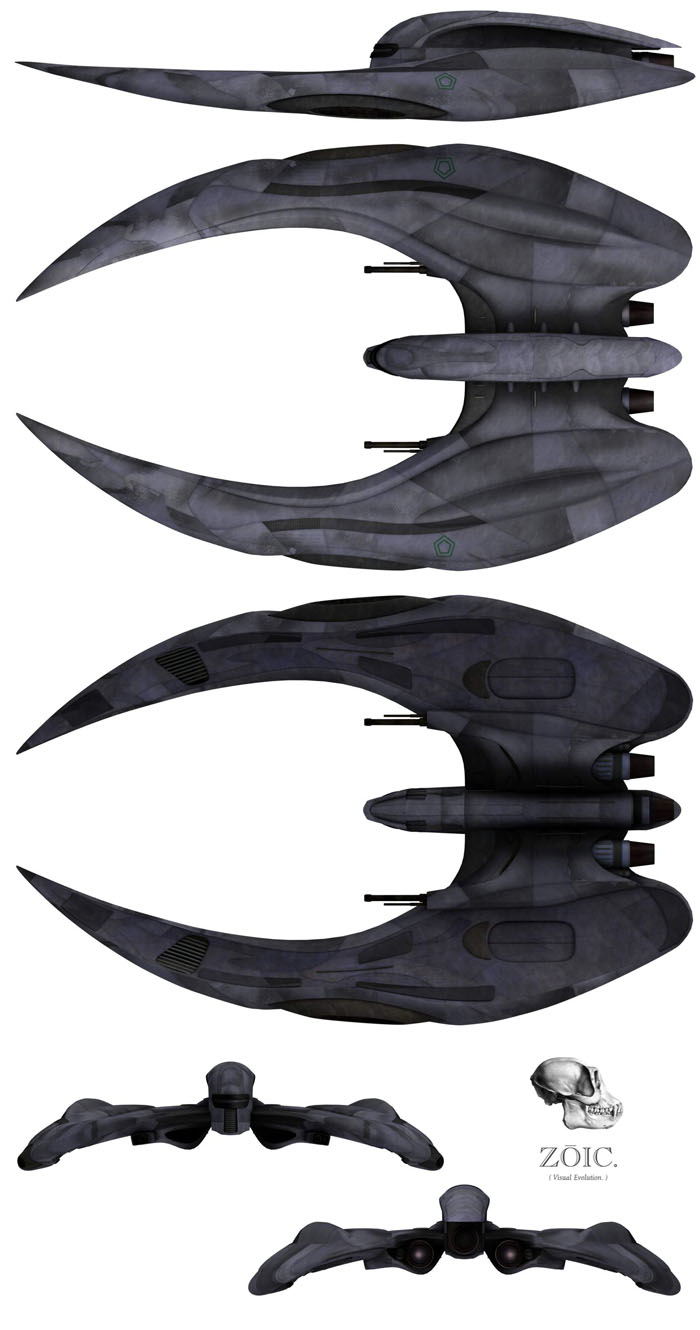
I've found this blueprint as reference, so the first step is to crop all of the images in Photoshop. I will have four different images at the end of the process (top, left, bottom and rear) to import into Maya 2011 as image planes. It's important to use horizontal and vertical guides in Photoshop to resize correctly the images, because the references must have same dimensions.


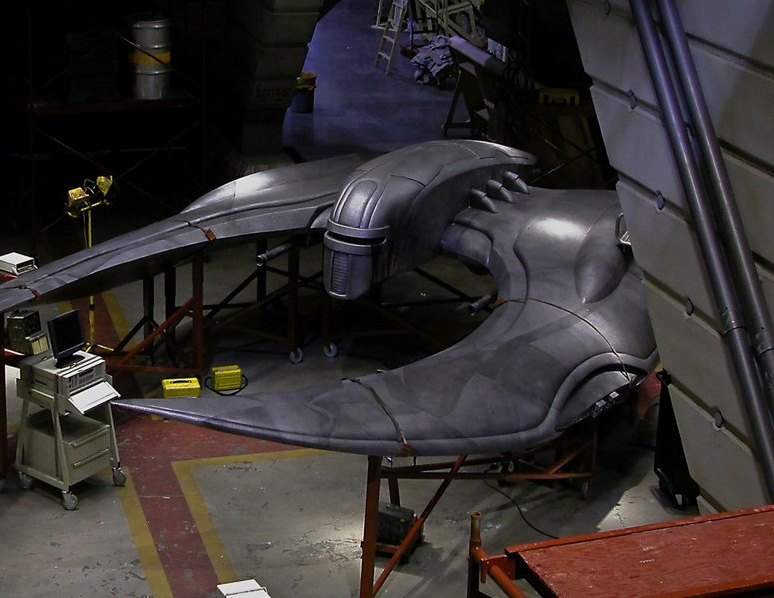
First impressions: the original model is fantastic, I love the design and the final look, this fighter is really awesome. I don't know the authot but I'd like to pay him a compliment. It is interesting to notice that the model is composed of 4 parts: the wings (I can model one of them and then mirror it), the engines, the weapons and the central part. The fighter hasn't a linear design, but it's possible to break down it into 4 parts to ease the modeling process.


I decided to get started from the wings. I think the wings are the funniest and the most difficult part of this model. I'm using traditional methods to model the wing, nothing fancy: I get started from a box, extruded it a lot of times, added some edge rings and moved the vertices to match my reference images. I'd want to create a low poly model, because I'd like to animate a fight between the viper and the raider and obviously the raider will be destroyed.


Anyway, during the modeling process, I prefer to smooth the mesh to see if it's correct and perfectly rounded. This step helps me to notice that the bottom needs some correction.

In the meantime I decided to use the references as texture, so, in a next article, I'd like to share my method to project the images from a camera to create a new texture. First of all I will create the UV maps, then I will project the reference images from a given camera (unfortunately, it's not possible to use an orthographic one).


Best regards.

mercoledì 23 giugno 2010

Viper MK II is done

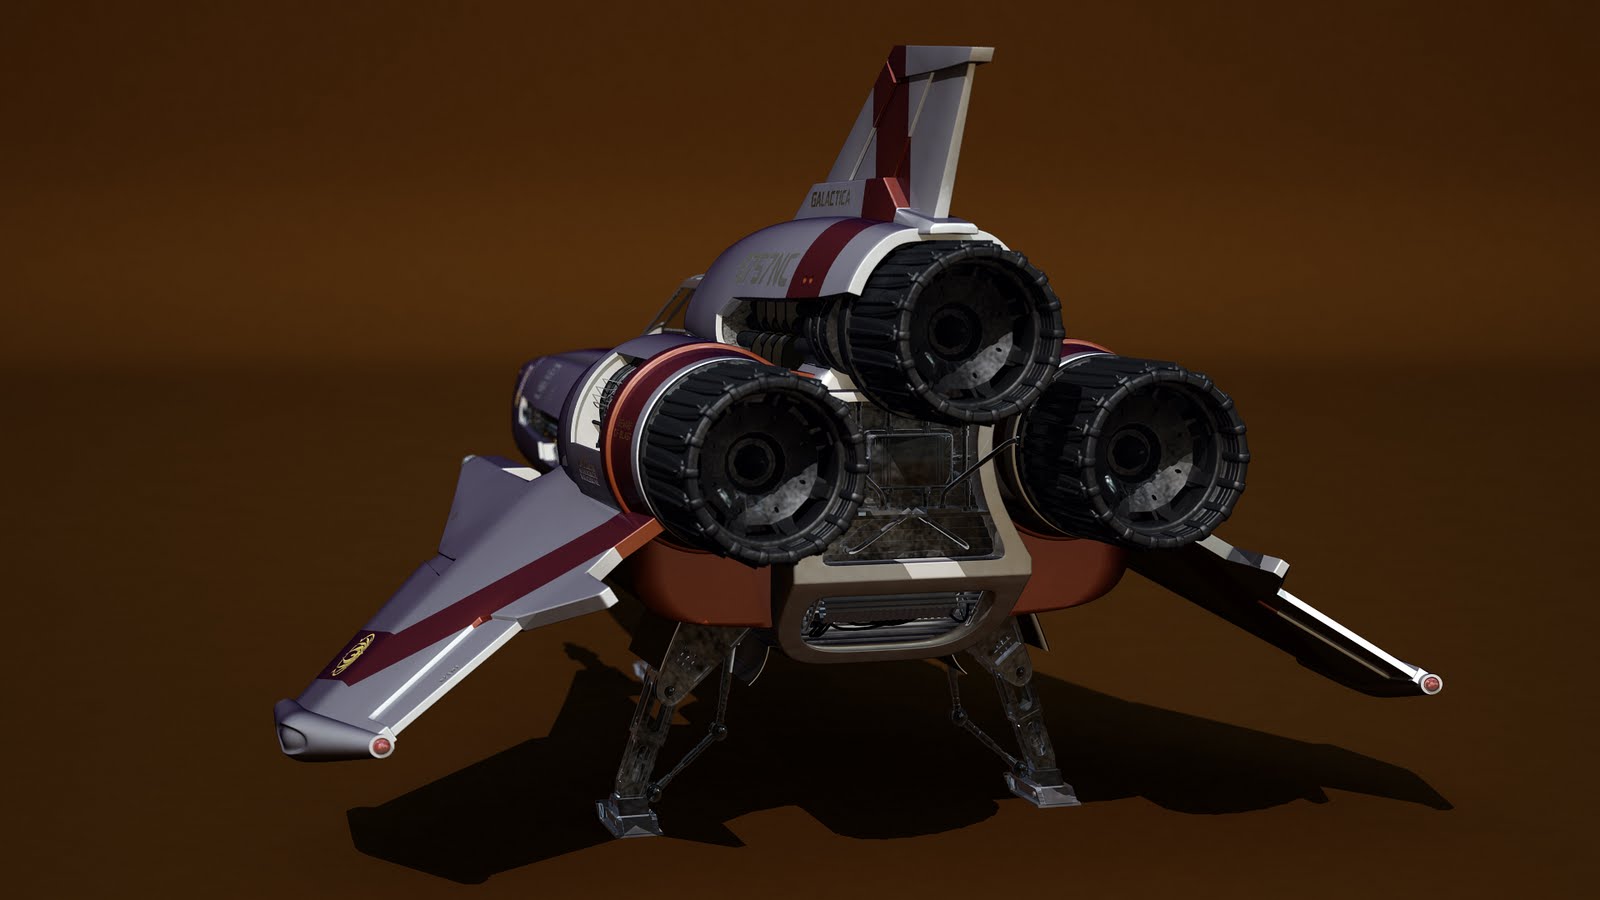
After the Cylon Centurion, the second homage to Battlestar Galactica is done. Viper Mark II is finally over: it is "the Colonial Fleet's primary space superiority fighter / attack craft during the initial Cylon War. 40 years later, they are used by Galactica to effectively combat the Cylons and their more advanced fighters  during the exodus from the Twelve Colonies".


The model is highly detailed and was totally redesigned: browsing the internet, specifically flickr, I found out these terrific photos of the original Starbuck's viper. aharvey2k's hi-res photos were a great start to understand and model all of the details and to extrapolate textures and the original font. I used Maya 2011 Hotfix 2 to model the Viper and Mental Ray to generate some test images:


As for the shaders, I used mi_car_paint_phen to simulate the unique characteristics of a mild car paint. I decreased the weight for the primary specular color and  modified the parameters for the flakes to match the aharvey2k's  photos. A mia_exposure_photographic was plugged into the MR lens shader slot of the camera. This shader is a tone mapper that converts actual pixel luminances (in candela per square meter) into image pixels as seen by a camera, applying camera-related parameters (such as f-stops and shutter times) for the exposure, as well as applying tone mapping that emulates film and camera effects. mib_blackbody light shaders were connected to the color parameters of the light shaders. I used a light probe image to illuminate the viper with measurements of real light. Below a couple of quick render tests.


I made an attempt to plug layered textures into dirt_color and dirt_weight to cover the underlaying paint and clearcoat layers in order to to get variations in the dirt across the surface. The dirt texture was painted over the UV map in Photoshop. The focal length is obviouslly wrong but this attempt helps me to notify some problem: probably I have to decrease the reflections and, in any case, the image should be modified into a compositing package.


Last, but not  least, homage will be the Cylon Raider.

Best regards.

giovedì 6 maggio 2010

Cylon Centurion - Final render

It's time to complete my homage to Battlestar Galactica, one of my favorite TV shows. The first model to render is the fabulous Cylon Centurion, "a fully armored, metallic automaton that functions as the basic foot-soldier of the Cylon ground forces".
I used Autodesk Maya 2011 to model and render  my centurion. The Cylon soldier has got a lot of bevelled and rounded surfaces, so I decided to use Subdivision Surfaces when possible.
Finding good photos and references was the most difficult part of this process. I found out this site and it was a good starting point for the body. Unfortunately, the head and some details are barely visible, but I found out 
two more photos for the head.


Due to the low-quality photos, the head was quite complicated but the images I found in a second moment were good and the modeling part turned into a great amusement. I used a low poly sphere to start sculpting the head. On the left there's the original model, on the right my low poly cage.


I converted the low poly cage into a subdivision surface to smooth the head. After conversion, all edges were creased: the result is very good for me.
Only the head was modeled with polygons, all other parts were approximated  using subdiv surfaces.


Once the model was finished, I had to assign good materials to subdiv surfaces. I used a metal material created by Jeff Patton, a great CG artist, for all metallic parts. I downloaded a good, free angular map to lluminate my model with measurements of real light.


Test above is really good for me but I'd like to add my centurion to a photo representing a real scenario.


With Final Gather turned on, rendering took 1 hour on my computer but I like very much the result: the centurion is hunting rebels in a Caprica's wood.
The next model to render will be my new Viper MK II.

martedì 6 aprile 2010

Funky gallo

My brother Massimo manages a team of players in an Italian fantasy soccer league named Hattrick. The team is named Alligallya, a play of words from an old Italian song . He asked me for a logo for his team and I was very happy to sketch a funky cock (on the left... I'll buy a pen tablet as soon as possible, I think I need it :) ) and trace it in Photoshop. No special effects, I used transparent gradients for reflections and soft shadows to fake depth. This kind of works remembers me how lazy I'm: the head is good, the torso and everything else are not exceptional. But I need a rest after a couple of hours. Probably I'll fix the torso tomorrow. I like to help my brother, his team is quite scanty (lol, it's a joke, Max) :)
Best regards

giovedì 11 marzo 2010

A pilot for my Viper MK II: sculpting the head

My Viper needs a pilot, so I have just started to sculpt the head.

The first step: I have created a low poly head in Maya and then I have imported it into ZBrush. The goal is achieving the normal map from the hi-res model and using it in Maya. Nothing fancy here, I need a simple model: the pilot will be visible in a few frames during the animation, the fighters are very detailed and I can't "spend" a bunch of polygons. I found out some interesting photographs browsing the internet to use as reference for my 3D head.


The image on the left is the result of my work. Using the standard brush and the move tool, I have sculpted a simple head in 30 minutes. I'm pretty happy about my head, I'm creating a tough, die hard pilot! I have used a couple of alpha brushes to add details like the beard, the eyebrows and hair. Probably this step is useless, but ZBrush is so amusing! Now I can create the normal map to "smooth" my low poly head.


The next step is boring (for me): it's time to use Photoshop to paint a texture on the UV map. Probably it's the moment where I waste a lot ot time. I can create a model very quickly but I'm never satisfied when I use Photoshop. Actually I'd like  to send my model to the texturing department but I  dont'work for Pixar, it's all home made. In this case I created the texture in 3, 4 hours making it again, and again, and again. I used a lot of references I found in internet. The result is not phenomenal but I can live with it.  I really don't like flat hair but I cannot use fur, it's too expensive. No eyes at this moment, this guy is still blind!

The day after: I have tought of using a technique for video games to have my hair. The idea is simple: creating a lot of cards to fake the hair. The result should not be terrific but this guy will have a helmet and I won't spend a lot of resources for the hair. The problem is that I have to come back to Photoshop to create a new texture with a good alpha channel. The image on the right shows the cards on top of the head.


What a crew cut for this guy! I think the result is pretty good, considering I'll must model the helmet. It's very important to program what we are going to see in the animation not to waste useful resources. The final texture is a tga file with an alpha channel for the transparency. I used a single hair wisp scaled, mirrored and altered a lot of time to achieve a minimum of variety. 1 hour of Photoshop for this work. As said before, this result could be better but I have to model the helmet, the body, the boots and the hands yet. And this guy will be visible for a few frames. Ok for now, it's time to find a reference of the helmet used in Battlestar Galactica.
Best regards!