mercoledì 13 gennaio 2010

Creating a hostname that points to your IP address

If our computer has a dynamic IP, we can create a hostname that points to our IP address. A hostname is very useful because it allows us to use a static name (ie. myname.host.org) instead of a dynamic IP. For example, we can think to use a hostname to contact a remote computer with a dynamic IP address.
There's a very simple way to do that: we can use a free service provided by DynDNS.com:
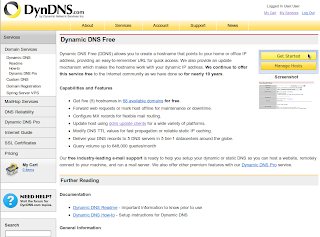
Redirect your browser here and create an account.
As you can see, "Dynamic DNS Free (DDNS) allows you to create a hostname that points to your home or office IP address, providing an easy-to-remember URL for quick access. We also provide an update mechanism which makes the hostname work with your dynamic IP address. We continue to offer this service free to the Internet community as we have done so for nearly 10 years."
The service is free so click on "Get Started".
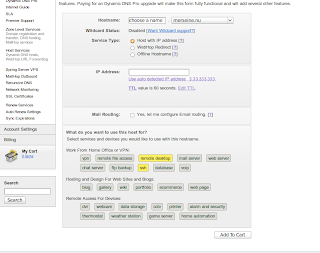
Insert a name  and choose a domain from the combobox. Leave "Host with IP address" selected. Insert the remote IP or "use auto detect IP address". Leave "Mail Routing" unchecked.
Now we have to choose the services we would like to use with our hostname: in my case I selected Remote Desktop and SSH.
Click on "Add to cart" and don't worry: the service is free.

As you can see, our cart now contains free services only. We can activate our hostname.
Click on "Next >>" and then on "Activate Services".


Now we have to find a method to inform DynDNS' servers when our remote computer changes the IP address. Fortunately DynDNS allows us to download an update client: "The update client periodically checks your network's IP address; if it sees that your IP address has changed, it sends (updates) the new IP address to your hostname in your DynDNS.com account".

Cool! Redirect you browser here and download the client for your OS.

In my case, i will use the Linux/Unix client. If you have Ubuntu you can follow next steps:

unpack ddclient, run a terminal and type:

 stefano@SERVER:~$ sudo cp ddclient /usr/sbin/
 stefano@SERVER:~$ sudo mkdir /etc/ddclient
 stefano@SERVER:~$ sudo cp sample-etc_ddclient.conf /etc/ddclient/ddclient.conf
 stefano@SERVER:~$ sudo gedit /etc/ddclient/ddclient.conf

uncomment and use following parameters:

 protocol=dyndns2
 use=web, web=checkip.dyndns.com, web-skip='IP Address'
 server=members.dyndns.org
 login= your_username_at_DynDNS
 password=your_password_at_DynDNS
 your.hostname.org

Now we can run ddclient as a daemon at boot time. Run a terminal and type:

 stefano@SERVER:~$ sudo cp sample-etc_rc.d_init.d_ddclient.ubuntu /etc/init.d/ddclient
 stefano@SERVER:~$ sudo update-rc.d ddclient defaults
 stefano@SERVER:~$ sudo /etc/init.d/ddclient start

Done!
Best regards.

martedì 12 gennaio 2010

Documenting architectural facades with a photogrammetry software


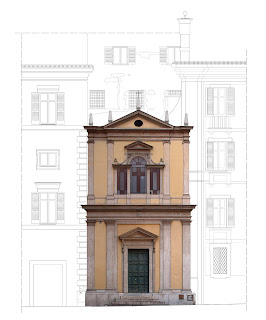
The image on the left is a mosaic of several photos traced in AutoCAD and representing the architectural facade of San Macuto in Rome. In this case my CAD drawing is superimposed on the mosaic.
All photographs I took contained perspective distortions which were eliminated with a freeware photogrammetry software called RDF. Then all images were composited in Photoshop and, as said before, traced in AutoCAD.
I could take the entire facade of the church in just one photograph but I needed all architectural details. It's almost impossible to do a work like this with a single image.
Precision mosaicing would require a dedicated software solution because Photoshop leaves us the task of mounting all photos together as best we can. Anyway the result is pretty cool and suggestive. Some programs offer an automatic vectorialization of a photo but I often don't like the results.
RDF uses a method called photogrammetry with measurements: the image is straightened up through measurements taken on the object of photogrammetry. So we need at least two measures (one horizontal and one vertical).
The programs offers two ways to fix the perspective distortion: analytic and geometric. I prefer the second way because it's faster and more intituitive, so I realised a short video tutorial to explain the geometric mode to straighten up photos with RDF. 
English and Italian subtitles are available for this video. Locate the logo in the lower right corner and select the subtitles you prefer.


It's also possible to use this method to create perfect textures for 3D models.
The image on the left is a render of a 3D model (Concattedrale di Taranto by Gio Ponti) I made some years ago.
All textures were created straightening up several photos with RDF. If the model has a good UV Map  with the right aspect ratio, it's pretty simple to use photographs as textures.
In this case the result is often very realistic.

giovedì 7 gennaio 2010

Keeping up the (good?) 3D work : a simple animation of my Viper MK II


I'm just working on my 3D Viper MK II. Two months ago I rendered a simple shot with Autodesk Maya: I wanna publish my test to compare it to future results:


For this test, I used particles to realised two nebulas,  pure gases, the stars and the engine flames. No sound at this moment. I rendered a bunch  of passes  composited in Eyeon Fusion. Once my modeling work will done, I'll render a complete animation of a fight between Viper and Cylon Raider (already finished).

Best regards.

Interview with Jacob van Rijs (MVRDV)


On November 21, 2009, Blogosfere gave me the opportunity to interview the Dutch architect Jacob van Rijs during the Inspirational Design Happenings organized by Bombay Sapphire. In 1991 together with Winy Maas and Nathalie de Vries van Rijs set up MVRDV.


Redirect your browser to whymoda.blogosfere.it (a professional blog by Sandra Rondini) for more photos and informations about the event (Italian only).

Regards

Recording TV shows with an old Pinnacle PCTV Miro on Ubuntu Karmic 9.10


In my holidays house I have a pc with a "vintage" Pinnacle PCTV Miro capture card. Even though my card is superseded by new models and by DVB-T cards, in my holidays house we'll receive Digital Video Broadcasting - Terrestrial signal in late 2011 and I just go on using my card. Linux gets continously updated, but I notified that my capture card needs a fine tuning on Karmic 9.10 cause autodetecting doesn't work properly.

Why? BTTV uses the PCI Subsystem ID to autodetect the card type.  The output of lspci:
01:07.0 Multimedia video controller: Brooktree Corporation Bt848 Video Capture (rev 12)
Only bt878-based cards can have a subsystem ID (which does not mean that every card really has one).  bt848 cards can't have a Subsystem ID and therefore can't be autodetected: PCTV Miro is a bt848-based card. Ok, I really appreciate the possibility to record my preferred TV Shows with mencoder, so we have to survive holidays with patience. Let's find my vintage PCTV in the list of supported cards:

 
 1 -> MIRO PCTV

Good, take a note: Pinnacle PCTV Miro is card 1.
Now, the TV tuner! I tried a lot of tuners and for me the right one is:

 tuner=0 - Temic PAL (4002 FH5)

Take another note: Pinnacle PCTV Miro' s tuner is 0.

My card has not radio support, so another good option is radio=0.
Browsing the internet, I found my card has 35 MHz crystal installed. It means we need the option pll=2.
BTTV capture driver only provided applications with two buffers by default in versions shipped with kernels before 2.4.21. Advanced deinterlacing algorithms require a longer history of past input frames in order to predict motion in the video stream. To give applications more buffers, use this option when loading the bttv driver: gbuffers=4.
Now, the audio and first of all, GPIO pins:
GPIO means General Purpose I/O. Video decoder chips like the SAA713x or the BT8x8 have a number of I/O pins that are not used by the video decoder itself. They have no special purpose, each manufacturer can do with them whatever he wants.
Download BtSpy from here. This small utility can come in handy during the process to find correct GPIO pins. Run it on Windows, follow all directions and save the report. In my case I have something like this:
General information:
 Name:Pinnacle, Miro PCTV
 Chip: Bt848 , Rev: 0x00
 Subsystem: 0x00000000
 Vendor: Gammagraphx, Inc.
 Values to MUTE audio:
  Mute_GPOE  : 0x23000f
  Mute_GPDATA: 0x230002
 Has TV Tuner: Yes
  TV_Mux   : 2
  TV_GPOE  : 0x23000f
  TV_GPDATA: 0x230002
 Number of Composite Ins: 1
  Composite in #1
   Composite1_Mux   : 3
   Composite1_GPOE  : 0x23000f
   Composite1_GPDATA: 0x230000
 Has SVideo: Yes
  SVideo_Mux   : 1
  SVideo_GPOE  : 0x23000f
  SVideo_GPDATA: 0x230000
 Has Radio: No
Ok, I need this option: gpiomask=0x23000f audiomux=0x230002,0x230002,0x230000,0x230000
Almost done! You can try your grabber card in this way: run a terminal and type:

 stefano@SERVER:~$ sudo modprobe -r bttv
 stefano@SERVER:~$ sudo modprobe bttv card=1 tuner=0 radio=0 pll=0  gbuffers=4 gpiomask=0x23000f audiomux=0x230002,0x230002,0x230000,0x230000
 stefano@SERVER:~$ dmesg | grep bttv
[ 7173.661024] bttv: driver version 0.9.18 loaded
[ 7173.661029] bttv: using 4 buffers with 2080k (520 pages) each for capture
[ 7173.661112] bttv: Bt8xx card found (0).
[ 7173.661130] bttv0: Bt848 (rev 18) at 0000:01:07.0, irq: 17, latency: 32, mmio: 0xd8000000
[ 7173.661469] bttv0: using: MIRO PCTV [card=1,insmod option]
[ 7173.661473] bttv0: gpio config override: mask=0x23000f, mux=0x230002,0x230002,0x230000,0x230000
[ 7173.661479] IRQ 17/bttv0: IRQF_DISABLED is not guaranteed on shared IRQs
[ 7173.661515] bttv0: gpio: en=00000000, out=00000000 in=00ff07ff [init]
[ 7173.666902] bttv0: i2c: checking for MSP34xx @ 0x80... not found
[ 7173.667434] bttv0: miro: id=1 tuner=0 radio=no stereo=no
[ 7173.667438] bttv0: tuner type=0
[ 7173.678921] bttv0: audio absent, no audio device found!
[ 7173.687126] bttv0: registered device video0
[ 7173.687154] bttv0: registered device vbi0
[ 7173.687179] bttv0: PLL can sleep, using XTAL (35468950).

Cool! We can load our options at boot time. Type in our terminal:

 stefano@SERVER:~$ sudo gedit /etc/modules

Add the module bttv, then, as superuser, create a new file in /etc/modprobe.d. Call it bttv and add this line:

options bttv card=1 tuner=0 radio=0 pll=0 gbuffers=4 gpiomask=0x23000f audiomux=0x230002,0x230002,0x230000,0x230000

Once the setup is finished, we can capture our preferite TV shows with mencoder:

 stefano@SERVER:~$ mencoder tv:// -v -tv driver=v4l2:width=640:height=480:input=1:device=/dev/video0:immediatemode=0:forceaudio:outfmt=yv12:adevice=/dev/dsp -o outfile.avi -oac mp3lame -lameopts cbr:br=96 -ovc lavc -lavcopts vcodec=mpeg4:vbitrate=1000:autoaspect=1:vhq -vf pp=lb -ffourcc XVID -endpos 00:02:00

This command will record 2 minutes of the video stream on /dev/video0 using XviD codec and a quality similar to the TV shows you can download from EZTV
If your output file hasn't sound, check wheter your line-in is mute. You can use this command:

 stefano@SERVER:~$ v4lctl volume mute off|on

to unmute your grabber card.

That's all!
Best regards.

Remote Desktop via Openssh and Putty


I often need to remote control my Ubuntu server with a Windows client. Even if I do very simple operations via Remote Desktop, I prefer to forward my traffic through SSH Secure Shell. The steps to tunneling an insecure connection are very simple.

 SERVER SIDE

Install Openssh Server and ssh. Run a terminal and type:

 stefano@SERVER:~$ sudo apt-get install ssh openssh-server

Generate a pair of public and private keys executing the following commands:

 stefano@SERVER:~$ mkdir ~/.ssh
 stefano@SERVER:~$ chmod 700 ~/.ssh
 stefano@SERVER:~$ ssh-keygen -t rsa -b 2048
 Enter passphrase (empty for no passphrase):
 Enter same passphrase again:
 stefano@SERVER:~$ cat ~/.ssh/id_rsa.pub >> ~/.ssh/authorized_keys
 stefano@SERVER:~$ chmod 600 ~/.ssh/authorized_keys

Edit your sshd_config:

 stefano@SERVER:~$ sudo gedit /etc/ssh/sshd_config

Usually I use these settings:

 Port 22
 PermitRootLogin no
 RSAAuthentication yes
 AuthorizedKeysFile %h/.ssh/authorized_keys
 PasswordAuthentication no
 AllowUsers names_of_allowed_users

Copy ~/.ssh/id_rsa to your Windows client.
Enable Remote Desktop clicking on System --> Preferences --> Remote Desktop:


Now let's configure the router. We need to setup port forwarding on your router. To do that, your pc has to have a static IP. For example, you could use 192.168.1.2. Now redirect your browser here, choose your router, then select SSH and follow all steps. At the end you should have something like this:


WINDOWS CLIENT

Download PuTTy and PuTTYgen
PuTTYgen can import the private key generated on the server and save it in a format PuTTy-readable. Run PuTTYgen, then click Conversions --> Import Key:


Now click "Save private key"
Run PuTTy and follow next steps:


HINT: You have to enter 192.168.1.1 if you're in your home/office lan. If you wanna control a remote pc outside your lan, you have to enter an internet IP address. If your remote computer has a dynamic IP, you can evaluate the possibility to create a hostname that points to your IP address.


Now go back to "Session" and save this setup, then click "Open". Log in with your username and enter the password you have chosen for your private key.

Last thing to do: you need to download a VNC viewer to controll your remote desktop. I really like TightVNC.  Download Viewer executable only and run it:


Insert 127.0.0.1 as VNC Server and click "Connect"

 Enter the password you have choosen for your Remote Desktop


Voilà! You can control your remote computer. You can save the connection info not to repeat the last steps.


Click Yes, choose a path to store the informations and create a link on your desktop.

That's all!


lunedì 4 gennaio 2010

How associating .doc documents to Microsoft Word on Ubuntu Karmic 9.10

Create a script wherever you want:

#!/bin/bash
env WINEPREFIX="~/.wine" wine "C:\Program Files\Microsoft Office\OFFICE11\WINWORD.EXE" "`winepath -w "$@"`"


call it "Microsoft Word 20xx" and make it executable. Go back to a .doc file, right
click --> Open with --> select the script. Voilà!

Regards.

µTorrent on Ubuntu Karmic 9.10


I like µTorrent because it's really a tiny bitTorrent client and because it has a wonderful RSS support. At this moment the latest release cannot be installed on Ubuntu 9.10, so we need to download at least µTorrent 1.8.2. Right click on the file and open it with wine. Once setup is done, µTorrent will download the latest release and the language pack. Done!


Now you can create a menu item

Run System --> Preferences --> Main Menu
Select Internet, New Item


It's possible to associate .torrent files with µTorrent in Firefox. Save this script
as µTorrent in /usr/local/bin:

#!/bin/sh
cd ~/.wine/drive_c/Programmi/uTorrent
if [ "$1" != "" ]; then
var="`echo $1 | sed 's/\//\\\/g'`"
var="Z:${var}"
wine utorrent.exe "$var"
else
wine utorrent.exe
fi

Make it executable, go back to Firefox, click on a torrent link. A new window appears: in the "Open with" combo box, select other and then, the path to your script.
Now if you watch TV shows like Lost, you can follow this tutorial to automagically download latest episods.

domenica 3 gennaio 2010

Getting Logitech Quickcam Express USB webcam to work with Skype on Ubuntu Karmic 9.10


This cheap webcam is a real drama. It never worked on Ubuntu. Now something changed. As you can read here,
"Linux kernel offers an API to access a wide variety of video (input mostly) devices through the video4linux API...[CUT] Currently the v4l API is strictly a userspace <-> kernelspace API, so there are no further support libraries for applications to access v4l devices. This means that applications need to support reading the frame data from the video device in a variety of video formats and then converting it to a video format suitable for their own use."
Logitech Quickcam Express USB webcam uses the gspca driver.
"The out of kernel gspca usb webcam driver framework solved the video format problem by doing conversion from hardware specific compression formats (usb 1.1 bandwidth is too low to carry raw frames at a decent framerate) to generic formats as supported by most applications in the kernel. With the merging of the gspca driver into the mainline kernel, this conversion has been removed from gspca as video format conversion clearly does not belong in the kernel."
Ok, let's get started. If you want to use your cheap webcam with Skype, you have to follow these directions:
  1. Run a terminal and type: bash -c 'export LD_PRELOAD=/usr/lib/libv4l/v4l2convert.so; skype'
  2. Go to Options --> Video devices, select your camera (/dev/video0 for me) and click "Test"
If it works, you can create a script in /usr/local/bin:

#!/bin/bash
export LD_PRELOAD=/usr/lib/libv4l/v4l2convert.so
skype

 
Call it runSkype, make it executable and add it to the startup applications.
As said before, the v4l API is strictly an userspace, so if you want to switch from an user to another, Skype will not work properly for the new user. Probably you'll need to unplug your webcam and plug it again but I have never tested this fix. Otherwise you won't have problems.
Regards.

Getting Promise Fasttrak 376 to work on Ubuntu Karmic 9.10

Ubuntu Karmic 9.10 cannot recognize the hdd if you have this old controller.
This solution worked like a charm for me:

  1. Boot Ubuntu LiveCD as usual
  2. Once booted, run a terminal and type: sudo apt-get remove dmraid
  3. Check everything went fine with the following command (value must be 0): echo $?
  4. Double click on Install Ubuntu 9.10
  5. Proceed as usual.
Regards.

Getting ATI Radeon 9500 PRO to work properly on Karmic 9.10


I have an old pc with an ATI Radeon 9500 PRO and Ubuntu 9.10 Karmic. I have experienced very slow flash videos, painful loading of wine programs and changing gtk2.0 themes. I have found a solution browsing the internet and unfortunately I cannot give the author the right credits at this moment ( I hope to do it soon editing this post). This solution works like a charm for me:

  1. Run a terminal and type: sudo /etc/init.d/gdm stop to shut down Gnome.
  2. Log in with your username and password
  3. Now type sudo Xorg -configure to create xorg.conf.new in your home.
  4. Type command sudo gdm stop to restart Gnome.
  5. sudo gedit xorg.conf.new
  6. Add these lines in Section "Device":
  • Option "AGPmode" "1"
  • Option "AccelMethod" "EXA"
  • Option "MigrationHeuristic" "greedy"
  • Option "AccelDFS" "true"
  • Option "EnablePageFlip" "true"
  • Option "EnableDepthMoves" "true"
7. Save as /etc/X11/xorg.conf
8. Repeat steps 1 and 4 to restart Gnome.

I discussed the matter at Ubuntu Forums.

Best regards.

Ubuntu Karmic 9.10 and NVIDIA GeForce 6200 - Black screen on startup

I enabled third party driver for a graphics card NVIDIA GeForce 6200 via Hardware Manager on Ubuntu Karmic 9.10. The recommended restricted NVIDIA driver v. 185 caused black screen of death on startup because of an acpi error (cat /var/log/Xorg.O.log). I fixed my problem in this way (if you installed third party driver and didn't reboot yet, just jump to step 7):
  1. Select recovery mode in GRUB boot loader to prevent loading of your graphics system.
  2. Log in with username and password and then type: cd /etc/X11/
  3. Now type: ls to check if xorg.conf exists (karmic doesn't create it during setup). if it doesn't exists, execute this command: sudo nvidia-xconfig to create a basic xorg.conf
  4. Modify xorg.conf with nano. Type: nano xorg.conf
  5. Find this line: Driver "nvidia" and replace it with Driver "nv". In this way Karmic will use its own driver and not the third party one.
  6. Restart your graphics system: sudo gdm stop
  7. Run a terminal and type: sudo nvidia-xconfig --nvagp=1 to create /etc/X11/xorg.conf with NVIDIA's agp enabled. You don't need to reboot your pc.
  8. Type in the terminal: sudo /etc/init.d/gdm stop
  9. Log in and type sudo gdm stop
  10. Now, hopefully, your pc should use nvidia driver
I discussed the matter at Ubuntu Forums.

Best regards